Modding Documentation Page
So there's going to be a LOT of information here, and maybe a devlog page isn't the best way to structure it. I'm not sure how all the infrastructure around modding should be set up yet, and things will likely be rather difficult when things are just starting out as they are now. I'll be trying to keep this page up to date with new/better structured information, but for now...
Getting Started
Assuming you're going to start with the example mod (downloadable below), you'll want to unzip it into a mod folder. This mod folder can be anywhere, but you'll have to be able to navigate to it. If you unzip the folder to a new "Mods" folder, the hierarchy should look like:
- Mods
- ExampleMod
- dialogue
- images
- sounds
- a bunch of .json files
- ExampleMod
Any future mods downloaded can then go into that same Mods folder, in their own folders next to ExampleMod.
Now opening the game and clicking to open the "Mods" menu, you can use the "Change" button to set your mod location to that new "Mods" folder. If you do it right, after closing the file selection popup, you'll be able to see a new box appear representing the example mod.

The mod menu's left section has two columns, representing mods that will and won't be loaded by the game when you start playing. Right now the Example Mod is unloaded, and the Base Game is loaded (and no, you can't unload the base game).
You can use the arrow button on the Example Mod box to move it into the loaded column. You can also click on the box to see the mod information.
In addition, there are buttons in the bottom right for some additional steps. Clicking the "Clear Mod List" button will move all mods into the unloaded column. Clicking the "Check Compatibility" button will have the game run a set of various validation steps in order to make sure that the mods you have in the loaded column will be able to be loaded by the game without issue. If you press the button with the Example Mod in the loaded column, you should see those checks appear in the log before it concludes that there are no issues.
If you're ONLY going to be loading mods, rather than creating your own, this is almost everything you need to know. Once you have a set of mods that you want to use, you can click confirm and play the game from there! The only other point to cover is in the Options menu.
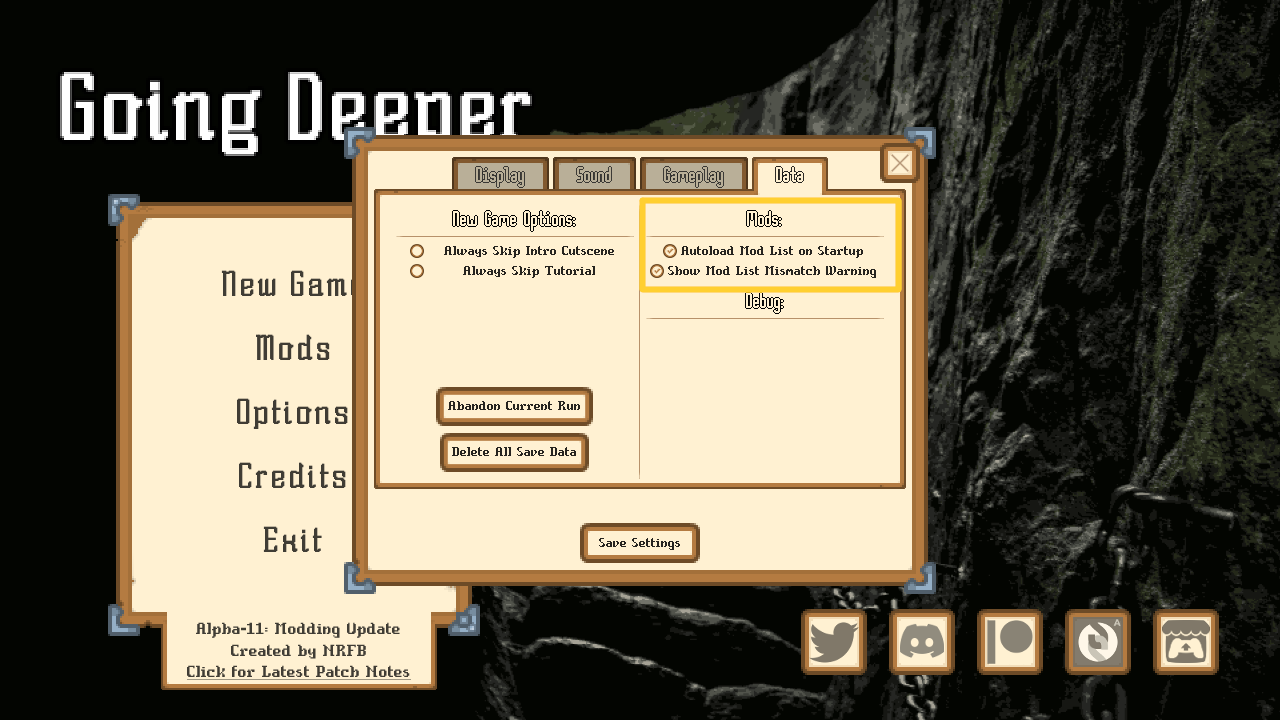
In the Data tab, there are two options related to mods.
Autoload Mod List on Startup - Whenever you click Confirm on the Mods menu, the game saves your list of mods internally, in the exact same way it saves your resolution and other options. Clicking this "Autoload Mod List on Startup" option, will cause the game to attempt to grab that saved mod list and get it ready to go as soon as the game opens. This means that you won't have to go into the Mods menu every time you open the game.
Show Mod List Mismatch Warning - An individual run of the game also saves a copy of the mods loaded for it. If the mods you attempt to start the game with through the Continue option don't match the list of mods that are currently loaded, the game will pop up a warning. Depending on the specifics of the mods you're working with, this warning may not matter. Everything could be fine. It could also break things.
In general, much like changing game versions I do NOT recommend changing your mod list in the middle of a run. Either abandon or finish your current run first.
Also in general, I don't see much of a reason to switch these options off, so they are on by default. If you know what you're doing or want to take things into your own hands though, there they are.
And that is it for getting started with loading mods. Next up, we have actually MAKING mods, which...
Hoo boy.
Getting Started (but with mod creation this time)
The only things technically NOT optional in creating a mod for this game are: Your mod being within a single file structure (though subfolders are allowed for some things), and an info.json file at the top level. You technically need other json files for your mod to actually have any content, but without an info.json, the game WILL NOT be able to recognize or use your mod.
If you're not familiar with json, it is just a format that I use for data in this game. Most everything is loaded from json files that are compiled into the exe file you run to play the game. Modding is basically just doing the same thing, but loading json from somewhere else instead. This means that in modding this game, you can make a LOT of stuff. Currently, the game can recognize and load:
- Monsters
- Traps
- Status Effects
- Skills
- Curses
- Spells
- Monster Status Effects
- Trap Status Effects
- Dungeon floors
- Dungeon events
- Camp events
And more will likely be on the table eventually, though it will require some more work and setup!
But yes, everything starts with an info.json file. The example mod has one that can be used as a template, simply copy it into your own mod and edit it to fill in the appropriate information. Make sure not to break the required json formatting though, as that will cause issues. Any improperly formatted json in your mod will. I have set up the Check Compatibility button to throw an error into the mod menu log if it finds a json file it can't parse, but that won't tell you where or how you broke things. There are plenty of online json checking tools, and any good IDE should also have some way to verify your formatting.
So assuming you've got some idea for mod creation figured out, as well as an info.json file copied into a new folder that will eventually become that mod and filled in with whatever info, next up would be moving on to actually create the content.
And it's... Somewhat difficult to tell you how to start.
Top level files
The game looks for specifically named files when attempting to pull content out of your mod. Taking a look at the top level files in the example mod, you can probably get an idea of the naming convention. Each of the above list of moddable things can have an all lowercase json file with underscores replacing any spaces.
Each one of these files will be an overall Array [] of Dictionaries {} separated by commas, with all keys and values within those dictionaries being one of: boolean, numeric, string, dictionary, or array.
As you can have sub-dictionaries and sub-arrays and sub-arrays of different dictionaries and so on, this can quickly get rather messy to look at. I will admit that I'm not always that clean in my formatting, as json doesn't technically require the file look pretty, just that it be formatted right. I suppose with your own mod, you can choose if you're going to pretty things up for readability or not.
In any case, as each file is talking about a specific type of entity to be loaded into and used by the game, some standardization of the data contained in these files is necessary. I will now move on to a listing of the formatting of each entity in each file, as well as what type of data is expected, and if the entity actually requires that data in order to function.
Some general notes before starting:
- The order of the fields within the dictionaries DOES NOT MATTER. You can have an ID at the bottom if you want, as long as an ID for that thing is present.
- Capitalization... SOMETIMES MATTERS. I've been trying to clean up places where it does so that everything can be case insensitive, but I've been pretty bad about being consistent there. In general, assume that strings (values contained in "") are case sensitive, especially with respect to IDs and places where specific strings have specific meaning. If you're unsure, either reach out to ask, or just try following the formatting that I use (if there is an example at least).
- There will be some concepts in this formatting guide that won't be immediately explained. They are specific concepts that I use to manipulate the data, and will have their own sections. If you see something referring to one of: "checks/triggers", "requirements/requirement dictionary", "amount field", "wildcards", "trackers", or "tags", and don't understand what exactly they mean, that's pretty much expected, as they will need their own sections to be explained/listed out properly.
- An "art guide" for reproducing the game's normal look will be made EVENTUALLY, though I'm not sure what I can do to assist if you want to make art of the knights themselves. Template PNGs for the the standard portrait frame cut-in, as well as the curse diamond shape can be found in the example mod images folder.
- There is some strangeness in loading external .wav files that haven't been previously imported by godot. Something about header information in the files that I have to figure out how to jump through the right hoops for. At present, .wav files aren't supported as audio. In the future, I will attempt to make them so.
- Making a system to allow you to mod in your own particle effects is... Possible, but was more than I was going to tackle for this update. This makes you somewhat limited visually, which I apologize for. If you want to make use of any particle effects currently in the game, that is possible, but custom particles aren't doable in this version.
Okay, now let's get started. Here are the formats for ALL the different types of json files you can have in a mod. You can see this in action by comparing with the example mod files.
- info.json
- monsters.json
- traps.json
- status_effects.json
- skills.json
- curses.json
- spells.json
- monster_status_effects.json
- trap_status_effects.json
- floor_data.json
- dungeon_events.json
- camp_events.json
And this is not a SPECIFIC file, but rather the format for any and ALL json files that contain the data for dialogues.
Other Concepts
The following concepts came up here and there in the previous format guides, and are somewhat important to know, or at least understand enough to mess with, if you want to be able to make the parts of your mod act how you want.
- Checks
- Amount Fields
- Requirement Dictionaries
- Wildcards
- Trackers
- Tags
(under construction still)
Leave a comment
Log in with itch.io to leave a comment.